How to Choose a Power Rack for a Home Gym
The power rack is the backbone of a serious home gym — it's what lets you squat, press, and bench heavy alone without a spotter — so buy it on the specs that actually matter and skip the ones that don't. In order of importance: get real safety spotter arms or straps rated for far more than you'll ever lift, because catching a failed rep safely is the entire point of a rack. Then match the frame to your training: 11-gauge steel and 3x3 tubing for a lifetime rack, or 12-gauge and 2x2/2x3 for a perfectly capable budget build. Look for Westside hole spacing (tighter holes through the bench-press zone) so you can set your bench safeties and j-cups exactly where you need them, confirm the uprights fit your ceiling with room for pull-ups and overhead presses, and check that it either bolts down or is stabilized by loaded plate storage. Finally, make sure the attachments you want — pull-up bar, dip handles, a lat/pulley tower — are compatible before you buy. Nail those, and the rack will outlast everything else in the room.
Affiliate disclosure: Trusted Health Gear is an Amazon Associate. If you buy through links on this page, we may earn a commission at no extra cost to you. Commission does not influence our rankings. Full policy.
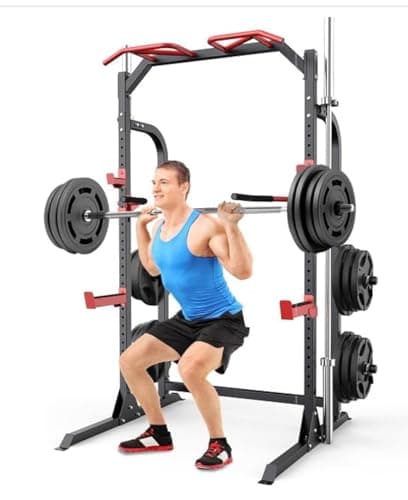
SunHome — SunHome Multi-Functional Power Cage with Storage
Best for storage — built-in weight-plate and Olympic-bar pegs keep a small platform tidy
Start with the rack type that fits your space and goals
There are four common formats, and the right one depends on how much you lift, how much room you have, and whether you train alone. A full power rack is a four-post (or six-post) cage you stand inside, with safeties on all sides — it's the safest option for heavy solo lifting and the most stable, but it needs the most floor space. A squat stand is two uprights with a crossmember or independent posts: cheap, compact, and great for smaller spaces, but with less built-in safety and stability, so it suits lighter or more experienced lifters. A half rack combines two front uprights with rear supports and forward spotter arms — a middle ground that saves depth while keeping decent safety. A folding wall-mount rack bolts to studs and collapses flat against the wall when you're done, reclaiming the floor of a garage or spare room; it's excellent for tight spaces but requires a solid wall and gives up some of the enclosed cage's peace of mind. Decide the format first, because it drives every other choice.
Steel gauge and tubing size: how strong is strong enough
Two numbers define the frame: steel gauge (thickness) and tubing size (the cross-section of the uprights). Confusingly, a lower gauge number means thicker steel. Eleven-gauge (about 0.120", or ⅛" thick) is the sweet spot for serious home lifting — stiff, near-silent under heavy loads, and effectively a buy-it-for-life frame. Twelve-gauge is thinner and a little cheaper, and while it's genuinely strong enough for the overwhelming majority of garage gyms, you may feel a touch more flex under maximal loads. Commercial gyms use 7-gauge, which is overkill for a home. Tubing size matters just as much: 2x2" is the compact, budget-friendly standard; 2x3" adds front-to-back rigidity; and 3x3" is the most robust and, importantly, accepts the widest range of accessories. A 3x3", 11-gauge rack will last a lifetime and grow with you; a 2x2", 12-gauge rack saves money and space and serves most lifters fine. Match the build to your loads and your budget honestly rather than paying for commercial steel you'll never stress.
Hole spacing: why Westside spacing matters
The holes running up the uprights set where your j-cups (bar hooks) and safeties can sit, and their spacing decides how precisely you can dial in a lift. Standard racks space holes evenly at 2" (50mm). Westside spacing tightens that to 1" (25mm) through the bench-press zone — roughly chest to shoulder height — while keeping wider spacing elsewhere. That extra adjustability is a big deal exactly where it counts: on the bench press, a 2" gap can leave your safeties either uselessly high (touching the bar mid-rep) or too low to catch you, whereas 1" spacing lets you set them a hair above your chest. If you bench in your rack, Westside spacing is worth prioritizing. Also check the hole diameter — 5/8" or 1" holes are the common standards — because it determines which safety pins and attachments will fit.
Upright height and ceiling clearance
A rack is useless if it doesn't fit your room or your body, so measure before you buy. Racks commonly run from around 80" up to 93" tall, and you need to account for two things: your ceiling and your overhead reach. For pull-ups, you want the top bar high enough to hang from without tucking your knees, but low enough that your ceiling doesn't stop you. For overhead pressing inside the cage, confirm you can lock out a bar without hitting the ceiling or the pull-up bar. If you have a low basement ceiling, look for a short-height rack (many brands offer 80" versions) or a squat stand; if you have height to spare, a taller rack gives more pull-up clearance. Leave a few inches of margin at the top rather than buying the tallest rack that technically fits — you'll thank yourself the first time you press overhead.
Safety arms and straps: the whole point of a rack
This is the feature you're really buying, so don't cut corners. Spotter arms (solid steel pins or arms) and safety straps catch the bar when a rep fails, turning a potentially crushing miss into a non-event and letting you push hard while training alone. Look for safeties rated well beyond your working loads — quality options are rated for 1,000+ lb — and made from thick steel without welds in the high-stress catch area. Pin-and-pipe or solid safety arms are the most common; strap safeties are gentler on the bar and the floor and are excellent for benching, though they can allow a little more bar drop. Whatever style you choose, set them at the right height every session: just below the bottom of your squat or a touch above your chest on the bench. A rack without properly used safeties is just an expensive squat stand.
Footprint, stability, and bolt-down vs freestanding
A rack has to be stable, and there are two ways to get there: bolt it down or weigh it down. Bolting a four-post rack into a concrete floor makes it rock-solid and lets you use a shorter, smaller-footprint frame — ideal if the rack lives in one place permanently. Freestanding racks stay put through mass: most have rear posts for weight-plate storage, and loading plates on them both organizes your gym and anchors the rack without drilling, which is the go-to for renters or anyone over a wood subfloor. Six-post racks add a rear section for storage and stability but eat more floor. Before buying, map the actual footprint plus the clearance you need to walk out a squat and rack the bar — then add space for a bench inside the cage. A rack that's stable and fits your walkout beats a bigger one crammed into a corner.
Attachments, compatibility, and weight capacity
A power rack is a platform, and its long-term value is in what you can bolt onto it. Common attachments include a pull-up bar (usually built in), dip handles, a landmine, a lat pulldown/low-row tower, j-cups and roller j-cups, plate and bar storage, and spotter arms. The catch is compatibility: attachments are matched to the rack's tubing size (2x2, 2x3, 3x3) and hole diameter (5/8" or 1"), and many brands use proprietary systems that only fit their own racks. If you think you'll add a pulley tower or dip station later, confirm it exists for your rack and buy into an ecosystem with the attachments you want. Finally, check the rated weight capacity — home racks range from roughly 700 lb to well over 1,000 lb — and make sure it comfortably exceeds your heaviest planned load plus a safety margin. Buy the rack for the gym you'll have in five years, not just the one you have today.
SunHome — SunHome Multi-Functional Power Cage with Storage
Frequently asked questions
It depends on how and where you train. A full power rack (a four-post cage) is the safest choice for lifting heavy alone because its safeties surround you on all sides — if you fail a squat or bench, the bar is caught with no spotter needed. A squat stand is cheaper, far more compact, and fine for lighter loads or experienced lifters who are comfortable bailing, but it offers less built-in safety and stability. If you have the space and plan to push heavy solo, get the full rack; if space or budget is tight and you train more conservatively, a good squat stand or half rack can work.
Related reading
Sources
- Best Squat Racks & Power Racks — Tested (rack types, steel gauge, tubing, hole spacing, capacity) — Garage Gym Reviews, 2026
- Power Rack / Squat Stand Review & Ultimate Shopping Guide (11 vs 12 gauge, 2x2 vs 3x3, safeties, footprint) — Garage-Gyms.com
- Power Rack Buying Guide: Steel, Hole Spacing, Capacity & More (Westside spacing in the bench zone, 5/8" holes, safety ratings) — VERVE Fitness, 2026
- Essentials of Strength Training and Conditioning (facility and equipment considerations) — National Strength and Conditioning Association (NSCA)
SunHome — SunHome Multi-Functional Power Cage with Storage
$199.99 · on Amazon